Can Aluminum flux and filler stop connector faults?
Working with aluminum conductors in vehicle systems is genuinely different from anything you'd do with copper — and not in a forgiving way. The metal is lighter, sure, and that weight reduction matters in modern automotive design. But aluminum fights you at every step of the soldering process. Before diving into technique, it's worth understanding why this metal behaves so differently, and why so many Aluminum Braided Wire Manufacturers insist on a hybrid mechanical-plus-solder approach rather than relying on either method alone.
Aluminum builds an oxide layer almost the instant you expose fresh metal to air. That thin film is chemically stable, electrically resistive, and completely hostile to conventional solder adhesion. Standard tin-lead or typical lead-free solders — the kind sitting in most workshops — simply bead up and roll off. Add automotive conditions to that picture: road salt spray, thermal cycling from cold starts to engine-bay heat, and constant low-frequency vibration from the drivetrain. An improperly made joint doesn't just fail quietly. It corrodes, develops resistance, and can cause intermittent electrical faults that are maddening to diagnose.
What You Actually Need Before Starting
Skip the wrong materials and you'll waste time. Aluminum-specific flux is non-negotiable — it's formulated to chemically attack the oxide during heating rather than simply protecting a pre-cleaned surface the way copper flux does. Pair it with a filler alloy rated for aluminum; generic solders won't wet the metal properly regardless of how clean the surface appears.
Temperature control matters more here than in most soldering work. Aluminum conducts heat aggressively outward from the joint, which means you're constantly fighting the material's tendency to spread your heat input before the joint reaches working temperature. A soldering iron handles small-gauge wire adequately, but anything substantial may call for a small oxy-propane torch or a high-wattage soldering gun — used with care, since insulation damage is a real risk. Other essentials: crimp sleeves rated specifically for aluminum conductors, a stainless-steel wire brush, adhesive-lined heat shrink, dielectric grease, and marine-grade sealant for anything exposed to wheel-well splash. Eye protection and ventilation aren't optional; aluminum flux fumes are corrosive.
Building the Joint — Mechanical First, Always
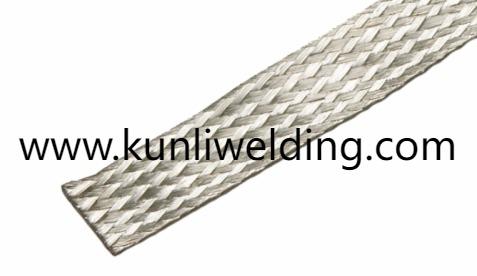
Strip back the braided conductor and align the strands carefully. Braided wire tends to splay, so a fixture or clamp to hold everything stable saves frustration. The mechanical crimp goes in before any heat is applied — this is the load-bearing element of the connection. Use a proper crimping tool with dies matched to your connector size. An undersized crimp die leaves voids; an oversized one deforms the connector without actually compressing the strands. After crimping, tug the wire. No movement is acceptable.
Why emphasize the mechanical joint so heavily? Because solder in an automotive context is doing a different job than in electronics assembly. It's improving electrical continuity, filling microscopic voids, and helping seal against moisture intrusion — not holding the wire in place under vibration loads. A joint that relies on solder for mechanical strength will eventually crack at the filler interface, usually at the worst possible moment.
Cleaning, Flux, and the Soldering Sequence
Surface preparation is where most failed aluminum joints originate. Use a stainless-steel brush — not steel wool, which can leave embedded particles — to abrade the conductor until you see bright metal. Then move fast. Re-oxidation begins within seconds of exposure. Apply aluminum-compatible flux immediately to the cleaned area and to the inside of the connector if accessible.
Heat the assembly with controlled, even strokes rather than dwelling in one spot. The goal is to bring the entire joint mass up to activation temperature, not to superheat the center while leaving the edges cool. You'll see the flux bubble and shift as it activates — that's your cue to introduce the filler alloy at the joint edge, not directly onto the heat source. Watch how it flows. Good wetting means the filler pulls into the braided strands and fills connector voids by capillary action. If it beads up instead, something is wrong: wrong flux, incompatible filler, or oxide still present. Stop. Don't add more heat hoping to force it. Once the filler has flowed, remove the heat source. Let the joint cool without disturbing it.
Sealing Against the Real World
Flux residue must come off. Many aluminum fluxes are actively corrosive at room temperature — leaving them in place trades a soldering problem for a corrosion problem. Follow the flux manufacturer's cleaning protocol, typically a specific solvent rinse, and allow the joint to dry thoroughly before sealing.
A light application of dielectric grease inside the connector barrel helps displace any residual moisture. Slide adhesive-lined heat shrink over the joint and apply heat evenly until the adhesive inner layer flows and bonds. At transition points — where the shrink ends and open harness begins — add a bead of silicone or marine sealant. In wheel-well or underbody locations, wrap the finished joint with protective tape and secure with rubber-lined strain-relief clamps. The sealant bead is an easy step that gets skipped more often than it should be, and it's usually the omission that leads to early corrosion failures in high-exposure locations.
Routing, Testing, and Long-Term Monitoring
Route the cable so the soldered section is never a primary flex point. Vibration fatigue accumulates at stress concentrations, and a joint that looks perfect at installation can develop microcracks over months if it's flexing constantly. Use rubber-lined clamps spaced appropriately along the harness to distribute movement away from the joint itself.
Test with a milliohm meter if one is available. A good aluminum joint should show low, stable contact resistance comparable to the conductor itself. Elevated resistance isn't always visible — it shows up as voltage drop under load or as localized heating. Come back and inspect the joint during the first few service intervals: look for moisture ingress under the heat shrink, any white or gray powdery residue indicating corrosion, and mechanical tightness at the crimp.
Closing Thoughts
Aluminum braided wire in automotive use isn't inherently problematic — it just requires a different set of habits than copper work. The combination of a sound mechanical crimp, aluminum-compatible flux and filler, disciplined surface preparation, and proper environmental sealing produces joints that handle temperature cycling and vibration reliably. For specific product selection — solder alloys, flux formulations, and connector types suited to vehicle harness work — manufacturer technical data is the right starting point. Additional materials guidance and application notes for automotive aluminum connections are available at https://kunliwelding.psce.pw/8p6qdb .